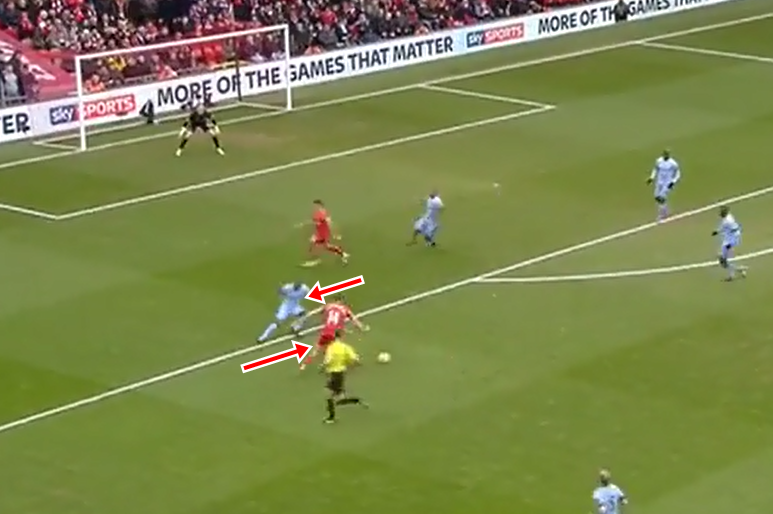
TFC 4-3-3

TFC 4-3-3

Thursday, March 26, 2015

Formation Isn't Just for Kick-Off

Here a picture from Sunday's Manchester United-Liverpool game. Click on it to enlarge:


Things of note:

*United, playing a 4-1-4-1, retain this shape while defending. There are four clear lines (four defenders, one holding mid, four midfielders, one central striker) with good spacing between the lines, and good spacing between each player in the two main lines. Note that players at this level pay as much attention to their teammates as to the opponent or the ball. The only way to keep proper shape and spacing is by knowing where your teammates are.

There is obviously much more freedom of movement when in possession of the ball. But quickly getting back into defensive shape after losing the ball is the hallmark of good teams. Mourinho's teams are always excellent at this, as are Van Gaal's, Ancelotti's, and Simeone's.

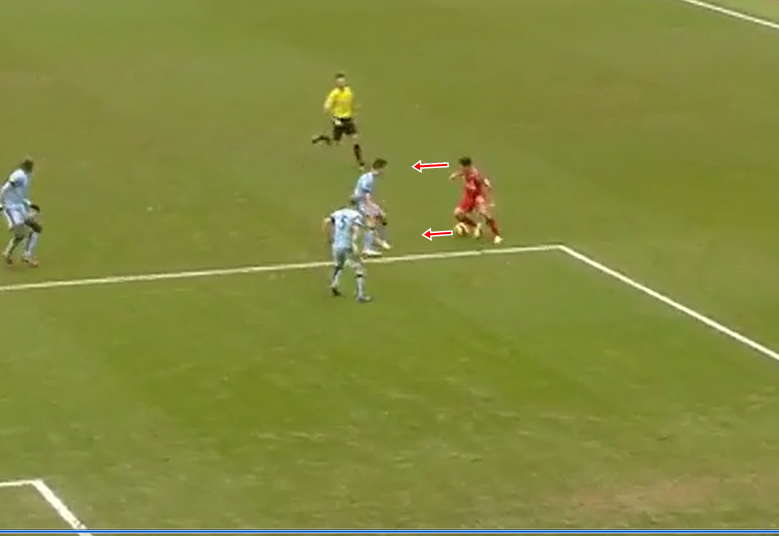
*All five midfielders are behind the ball. I can't stress this enough: It takes high work rate to play in midfield. That's why it's the position with the most sub-swapping. If you don't need a rest after fifteen or twenty minutes, you probably aren't getting forward when we attack and getting behind the ball when we defend.

*Wayne Rooney has dropped deep enough to be an easy pass option when his team wins the ball (but not so deep that he is no longer an outlet), and has not allowed a defender to get in-between him and his teammates. If that happened, he would continue to move side-to-side, to make sure he is in an available passing lane.

*No player is wider on the weak side than Daley Blind, and he is only just outside the arc of the penalty box - in other words, he is still relatively central. The idea is to stay compact to whatever side of the pitch the ball is on (strong side). Even if Liverpool get a player wide on the weak side and hit the perfect switch pass to him, United have the time the ball is in the air to shift their position to cover. Thus, there would be no need for Blind to go man-mark a Liverpool player, if one had gone into space on the right wing.

Saturday, March 7, 2015

Numbers and Work Rate

Here are some screen shots from the Capital One Cup Final between Chelsea and Spurs. Click each picture to enlarge.


Spurs counter-attack. Chelsea have four defenders back, in good position, and two players hurrying to track back (Zouma and Azpilicueta were caught out by the counter - Willian has gone to right back to slow the player with the ball, and Ramires is tracking back with Zouma). Notice that John Terry is the widest Chelsea player on the 'weak' side, and he is still in a central position. There is no reason to defend wider than that, especially if there is not a Spurs player making a run outside him. Chelsea are defending the strong side (side the ball is on), and the central area. The weak side is not dangerous. The lesson here - when countered, stay compact, and do not get stretched or pulled away from the danger area.


Given more time to track back in a slower attack, Chelsea now have 8 players within 20 yards of the ball, with 5 directly in between the goal and the Spurs player (Harry Kane) with the ball. This is simply a matter of work rate.

In a later attack, Chelsea again have numbers back, all flooded to the strong side and central areas. There are no direct lanes to goal, and plenty of Chelsea players available to pick up and track runs. The pressure defender (Zouma) also has the security of multiple cover players, letting him attack the ball (he blocked the shot, leading to a Chelsea counter-attack).

Here we see Spurs defending an attack, with the back four and midfield three in two clear, organized lines, and with good spacing. Again we see that no Spurs players have been dragged to the weak side, even though there is a Chelsea player making a run into that space. If the ball is played to him, Spurs will have time to shift to the right and deal with it. The primary danger area is central.


 Spurs again have good numbers back, with good shape and spacing. However, the two defenders in the boxed area are not goal side of the two Chelsea players attacking the most dangerous area. Spurs got away with it this time.

Here again, Spurs have 9 players back, with the back four and two central midfielders in good shape, offering two distinct lines of defense, and with good spacing between each player.

The kind of defending you see in these pictures takes WORK. In every case, midfielders and sometimes strikers busted a gut to get back behind the ball when possession was lost. Keep in mind, these are guys who do not have the luxury to ask for a sub for a rest. I don't expect you to be as fit as Premier League professionals, but you should be working at your maximum work rate. Too often, we defend with only our back four, with the results being 10 goals allowed in the last 3 games. If ever you are confused on the pitch, and unsure where to go, just work to get behind the ball. Sheer numbers works nine times out of ten.

Sunday, March 1, 2015

Show Them Outside

Just as the Arsenal-Monaco game gave us a couple of examples of bad defending, so too did the Liverpool-City game. Both Liverpool goals were a result of City defenders failing to show a Liverpool player in shooting position to the outside. Both were fantastic shots, to be sure, but could have been prevented, or at least made much more difficult.

First, let's make sure we understand what 'outside' means. In the final third, it means showing them toward the red shaded areas of the pitch in the diagram below:


'Showing' means overplaying the opponent to one side. If you're directly in front of him, you're not showing him outside. You need to be slightly to the inside position, taking away that route to goal. You don't simply give him the outside route, of course, but you make it almost impossible for him to take the inside route.

The guilty party for the Jordan Henderson goal was Fernandinho. In the first frame, as Henderson receives the ball and faces up to goal (but is not yet ready to shoot), Fernandinho is in decent position.


He needs to get a bit closer to Henderson by a step or two, but unfortunately for him, he is running at top speed and doesn't have his momentum under control. Henderson will use this speed and momentum against him by cutting the ball back to his right:


Fernandinho has already lost the battle at this point. He has allowed Henderson inside, into a good shooting angle, on his stronger foot, and with no teammate close enough to help.


Fernandinho is nowhere near by the time Henderson shoots. 1-0 Liverpool.

The second goal is worse, because City had two players in position to deal with Coutinho: Nasri pressing, with Zabaleta covering. It looks clear from where he is looking, where his hips are facing, and the touch he is taking that Coutinho has no interest in carrying the ball wide. He wants to cut into a more central, much more dangerous position.


And both Nasri and Zabaleta let him do it.


2-1 Liverpool, and most likely the end of City's title hopes.

So, why do well-trained, highly paid professionals make these basic errors?

Because they usually get away with them. Shots from these positions usually don't go in. So players defend like this a few times, get away with it, and repeat it, right up to the point where they don't get away with it.

You'v got to be thinking at all times when defending, and the first thought should always be: what is the danger here? In both of these cases, the danger was allowing a player in a relatively wide position to come inside into a dangerous shooting position.

For those who didn't see the game or the goals, here are the highlights: